This section provides troubleshooting for common problems you may encounter while setting up and using the IB-21E.
Visit the following web site for more information and downloads.
http://www.kyocera.com/w2k
I cannot print to my printer over the network.
Make sure the computer and the IB-21E can communicate. Try using the ping command, telnet, ftp, etc. In an IPX environment, try running AdminManager to see if the IB-21E can be discovered.
Verify the physical network connections. The network cables may be defective or not properly connected. Try changing the cables. Check the IB-21E card and verify that the green link light is on and the red data light is flashing (receiving data).
Turn the printer off, then on again. Try printing from another PC or to another network printer to help determine if the problem is with the PC or the printer.
I cannot see the IB-21E on the network, or often communication errors occur.
Verify the physical installation of the IB-21E. The network cables may not be properly connected. The network hub may be defective.
Initialize the IB-21E firmware. See Resetting to Factory Defaults.
If in a TCP/IP environment, try to directly connect the IB-21E printer and the PC on an isolated network. Connect only the IB-21E printer and the PC to a hub, or connect them directly using a crossover 10BaseT cable.
The Internet Protocol address is a unique number that represents a specific computer in a network. Format of the IP Address is four numbers separated by dots, e.g. '192.168.110.171.' Each number should be decimal of 0 through 255.
The IP address is compiled from 'network ID + user ID.' This results in three different IP address 'classes.' Representing the network ID as 'n' and the user ID as 'u,' each class has the following attributes:
Class IP Addressing First Segment Range Application Number of Networks Number of Users A n.u.u.u 0<n<127 Large scale network 126 16,777,214 B n.n.u.u 128<n<191 Mid scale network 16,384 65,634 C n.n.n.u 192<n Small network 2,097,150 254
For example, in a class C network, you can assign an IP address as '192.168.40.1.'
Devices having IP addresses with different network IDs ('n' above) cannot communicate even when they are in the same network segment.
Following is an example of a Class C IP network with 3 computers and 1 IB-21E printer:
Computer A 192.168.40.1 Computer B 192.168.40.2 Computer C 192.168.40.10 IB-21E printer 192.168.40.20
The IP address changes unintentionally on my IB-21E printer.
If the IB-21E received its IP address from a DHCP or BOOTP server, its lease may have expired and a new IP address assigned. If is recommended to assign unlimited leases or address reservations when using DHCP or BOOTP. For more information, see the Using DHCP section in Setting the IP Address Information.
To avoid unauthorized changes of the IB-21E settings, including from a browser, it is recommended that you define an administrator password. To change the password from AdminManager:
Run AdminManager.
Double click the IB-21E you intend to define a password for.
Open the General Tab.
Enter the old password if you previously had defined an administrator password.
Enter the new password.
To confirm, enter the new password again.
Click OK.
Note and retain the password.
I frequently receive errors when printing with NetBEUI. Why?
Use of the NetBEUI protocol provides a convenient method for initial networking setup of the IB-21E printer. However, NetBEUI is not designed to manage timeouts while receiving print data. This may cause errors when the IB-21E is receiving multiple print jobs.
If TCP/IP is available in your network environment, try printing via an LPR port to see if this alleviates the print errors. To create an LPR port, see Windows 95/98/Me Printing.
Printing fails with Macintosh.
Open the AppleTalk control panel from the Chooser. Make sure Ethernet is selected and the appropriate zone is selected as the current zone.
Verify that KPDL or KPDL (Auto) is selected as the emulation for the Option Interface.
If the red DATA indicator on the back of the IB-21E continues lighting, try adding the following command in the IB-21E End of Job String field. To access the End of Job String in the browser:
Connect to the IB-21E home page, e.g. http://192.168.40.17
Select Printer Control and enter the following command in the End of Job String: \x04
How can I reset all IB-21E settings back to their factory default values?
With AdminManager:
Run AdminManager and double click the IB-21E you want to initialize.
In the Protocol Setup window on the General tab, click Net Factory.
With a browser:
Connect to the IB-21E home page, e.g. http://192.168.40.17
Select Reset and click on Set all Network Settings to Factory Default.
With the jumper arrangement:
If you are unable to communicate with the IB-21E, it may be reset to factory defaults by changing the onboard jumper arrangement. Proceed as follows:
Turn printer power off.
Remove the IB-21E from the printer.
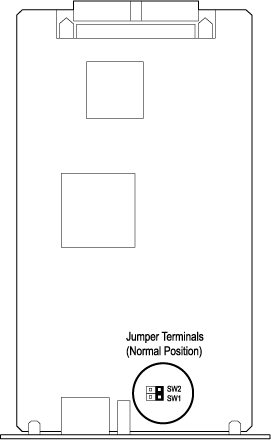
Locate the jumper terminals on the board. Note the normal position of the jumper in reference to the terminals.
Remove and fit the jumper so that the pins of terminal SW2 are short-circuited.

Turn printer power off.
Remove the IB-21E from the printer.
Remove the jumper from SW2 and reset it to the normal position as shown in Figure 1 above.
Insert the IB-21E in the printer.
![]()