The IB-21E offers a new function for e-mail printing. With this function, a print job can be e-mailed to a remote printer, such as over the Internet, using the standard print function in any Windows application. An IB-21E configured for e-mail printing connects to an e-mail server via POP3 and retrieves e-mailed print jobs.
Once the IB-21E is configured to retrieve e-mail, KPrint is used to create a port in Windows which directs to print jobs to the printer via e-mail. After creation with KPrint, the port may be selected when adding a new printer with the Windows Add Printer wizard (Local printer is selected for ports created by KPrint). A common implementation is to configure a shared printer to send print jobs to a printer in a remote office via the e-mail port created by KPrint. Users can then easily connect to the shared printer using only the Windows Add Printer wizard and send print jobs to the remote office. This offers an attractive alternate to faxing.
E-mail printing is setup by following the steps below (in the order which follows):
You can also send e-mail directly to the printer mail address from within an e-mailer software.
The printer must have an e-mail address assigned so that the printer can retrieve and print e-mail (print jobs) from the mail (POP3) server. Including the e-mail address, you will need the following information created and obtained from your mail administrator:
Make sure to have these information ready for entry in the following procedures.
Activating e-mail printing for the IB-21E may be managed either from AdminManager or any web browser. The following example uses the Internet Explorer to connect to the IB-21E homepage for configuration by entering the IP address as the URL, e.g. http://130.21.40.120.
To use AdminManager for this purpose, run AdminManager, double click the printer, and select the POP tab.
Make the following entries in the fields:
POP Protocol Click Enable. Check Interval Enter the interval in minutes that the IB-21E will check e-mail in the mail server. The default is 3 minutes.
User Profile 1 Click Enable. E-mail address Enter the e-mail address for the printer, e.g. ib21@test.com. The e-mail address should be obtained from the mail administrator. POP Server Name Enter the IP address or the host name for the mail server. This information should be obtained from the mail administrator. POP Port Number Enter the POP port number, normally 110, for the mail server. POP3 Login Account Name Enter the account name to login the POP3 server. POP3 Login Password Enter the password to login the POP3 server. Use APOP Click Yes if the mail server supports APOP protocol. Delete Mail After Retrieval Determine whether to delete e-mail in the server after it is printed. Mail Size Limit Specify the maximum size for e-mail that the printer can retrieve. The e-mails greater than this limit are left unretrieved in the server. Consult your mail administrator when you need to delete the unretrieved mail in the server. Filter Setting You can specify up to four strings for filtering e-mails to print applying all (AND) or any (OR) of them: S: string Title of e-mail T: string Recipient C: string Copy recipient F: string Sender | Match on any (OR) & Match on all (AND) For example, to print only the e-mails named Service or Technical, specify: S:Service|S:Technical
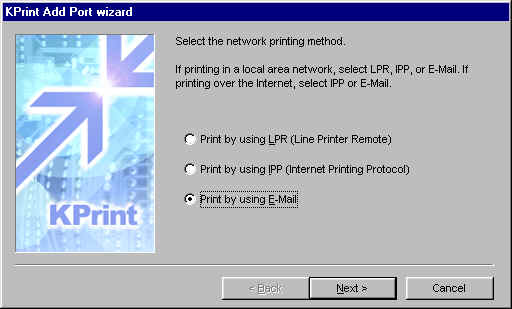
An e-mail port is created as you follow the KPrint utility wizard. KPrint provides support for several different methods of TCP/IP printing including e-mail printing (for the IB-21E only). For details, see Installing KPrint.
To create the e-mail port, proceed as follows:
If you have already installed KPrint in Windows:
If you have not installed KPrint in Windows:

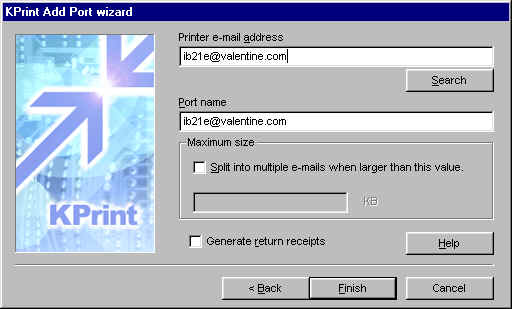
Port name By default, the printer e-mail address entered above is automatically entered. You may want to change this to any name, e.g. FS-8000C E-mail Port. The Port name is displayed in the Windows port list. Maximum size Splitting into multiple e-mails may be necessary on some systems which limit the size of individual e-mails. Return receipt Selecting Generate return receipts causes the printer to send e-mail confirmation for every print job. The SMTP protocol for the IB-21E must be enabled in order for this function to work. To activate SMTP, follow the procedure for 3. Activate and Configure POP3 for the IB-21E above, selecting SMTP on the main screen. On the SMTP page that will be displayed, check the Eneble radiobutton for SMTP protocol. When all information are set, click Finish. The e-mail port for the IB-21E has been created. The port is visible for selection in the Print to the following port list in the Windows printer Properties as the following section.
In the following section, it is assumed that you have already installed the printer driver for the IB-21E printer and the printer is already created in the Windows Printers folder (Start, Settings, Printers). If you have not done so, have the printer driver CD-ROM supplied with the printer ready in your CD drive and install the appropriate printer driver for the IB-21E printer. For details, refer to the Installing the Printer Drivers page.
To connect the printer to the e-mail port, proceed as follows:


- us-ascii
- iso-2022-jp
- iso-8859-1

To print jobs via the e-mail port, proceed as follows:
Click OK. The job will be posted in the mail server from which the IB-21E will retrieve the job in the interval of 3 minutes (See Check Interval.). When the interval times out, the printer prints the e-mail job covered by the following page:
Figure 11. Cover Sheet
If KPrint was set up to generate return receipts (See Figure 4.), the printer will send e-mail confirmation for every print job.
You can directly send e-mail from an e-mailer software to the printer e-mail address and print its message and attachments. The file types allowed for attachments are plain text (.txt), printable (.prn), and PostScript (.ps). Attachments of other file types are ignored and discarded.
Note that sending e-mail directly from an e-mailer software does not require the assistance of KPrint.
To send e-mail to the printer mail address, proceed as follows:
Enter the printer e-mail address (e.g. ib21e@valentine.com) as the recipient (To:).
Enter the subject and the message that will appear on the cover sheet.
Attach the file to print as an attachment.
Click Send. The e-mailed job will be posted in the mail server from which the IB-21E will retrieve the job in the interval of 3 minutes (See Check Interval.). When the interval times out, the printer prints the e-mail job covered by the page shown in Figure 11.
![]()