This section explains how to install the IB-2x in a Windows NetBEUI environment. Note Windows encompasses a wide range of client versions; from Windows 3.1 to Windows 2000, and thus a wide range of printing capabilities. These are more fully covered in Windows 95/98 Printing: TCP/IP. This section describes how to use AdminManager for setting up the IB-2x for NetBEUI printing.
| In order to utilize NetBEUI printing, your PC must be configured with the NetBEUI protocol and the Client for Microsoft Networks service under Network Properties. See Setting Up the PC for NetBEUI below. |
The IB-2x supports master-browsing in Network Neighborhood. Once the IB-2x is physically installed in the printer and connected to the network, it will create and manage a workgroup called KY-NetPrinters in Network Neighborhood, or join this workgroup if it already exists.
This section also covers the following topics:
To configure your Windows PC for NetBEUI printing, verify that all of the following Windows protocols and services are installed on your PC:
To verify this, proceed as follows:
In Windows NT 4.0, select Start>Settings>Control Panel>Network>Protocols.
In Windows 2000, select Start>Settings>Network and Dial-up Connections>Local Area Connection>Properties.
If you have added a protocol or service, restart the PC.
Proceed to the following section to configure NetBEUI printing.
Once your PC has been configured to support the NetBEUI protocol, you are ready to connect the PC to the IB-2x Printer. This is done by installing the printer driver for the NetBEUI printer in the manner described below.
Double click Network Neighborhood (or My Network Places) on the Windows desktop.
Double click Entire Network.
You will find computers and workgroups that are available on the network in this window. The printer workgroup, KY-NetPrinters, which contains the IB-2x interface card is also seen in this window.
- 'KY-NetPrinters' is the default workgroup name for the IB-2x. Unless the workgroup name is changed, all IB-2x printers on the network will appear in the KY-NetPrinters workgroup. If you want to change the workgroup to which an IB-2x belongs, refer to Changing NetBEUI Parameters.
Double click the KY-NetPrinters workgroup.
You will find the IB-2x printer(s) running the NetBEUI protocol.
Format for the default NetBEUI printer name is the last six letters of its Ethernet address prefixed by 'Ky.' If multiple IB-2x printers are displayed, you may identify the IB-2x printer that you want to configure by its Ethernet address (labeled on the back of the IB-2x interface card).
For example, if the Ethernet address of your IB-2x is '00:c0:ee:10:00:0d,' the default NetBEUI printer name is 'Ky10000d.'
To rename the printer to a more user friendly name, refer to Changing NetBEUI Parameters.
Figure 3. Contents of the Workgroup
Double click the IB-2x printer you want to configure in the KY-NetPrinters workgroup.
A printer icon for the IB-2x printer and two folders will be shown.
Each of these folders contain the text files that are automatically generated by the IB-2x. For details on these files, see The NetBEUI report and setup files.
Figure 4. Contents of a NetBEUI Printer
To install the printer, right click on the printer icon and select Install.
This launches the Windows Add Printer Wizard. After completing the wizard, the IB-2x printer you have configured above will be found in the Windows Printers folder (Start>Settings>Printers).
If you need to change the workgroup name and/or NetBEUI printer name, run the IB-2x AdminManager and change the NetBEUI parameters.
If you have not already installed AdminManager from the IB-2x CD-ROM, refer to Installing the IB-2x Utilities and install AdminManager.
Before proceeding, make sure that the IB-2x interface card is properly installed in the printer. If you have not already done so, refer to Installing the IB-2x Interface Card in the Printer.
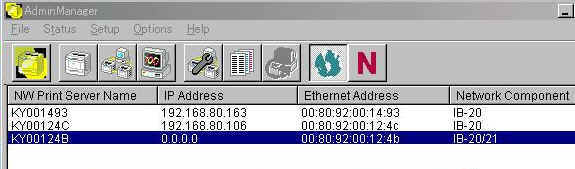
| In order for AdminManager to connect to the IB-2x interface card, it must be able to communicate with the card over TCP/IP or IPX. |
- If you do not see the interface card on the list, click
or select Search from the File menu.
On the Protocol Setup window, click the NetBEUI tab.
On the NetBEUI tab, make sure that Use NetBEUI Protocol is checked.
Change Workgroup as desired.
Workgroup represents the workgroup which appears in Entire Network in Windows Network Neighborhood. The default workgroup name is 'KY-NetPrinters.'
|
If the name of the Workgroup is changed from KY-NetPrinters, an existing Workgroup name must be used. The IB-2x will NOT create a new Workgroup (other than KY-NetPrinters). |
Printer Name correlates with Host Name in the TCP/IP tab. If you want to change the NetBEUI Printer Name, the TCP/IP Host Name must be changed.
The IB-2x automatically generates text files in the printer folders. See Figure 4. above. These files provide the following information:
| Folder | File | Function |
| report | Report.txt | This is a read-only file containing setup information. |
| Status.txt | This is a read-only file containing system status information. | |
| setup | Config.ini | This is an editable file containing the fields for 'Workgroup Name' and 'IP Address.' You can edit these fields using an ASCII text editor to change the workgroup name and IP address. For example: |
|
||
| The workgroup name should be KY-NetPrinters or the name of an existing workgroup. | ||
| By saving this file after editing, the IB-2x interface card will automatically reboot in approximately 3 seconds. | ||
| WebSetup (Internet shortcut) | This is a short cut to the IB-2x interface card homepage. By double clicking on it, the web browser (if installed in your computer) will automatically access the home page in the interface card. You need TCP/IP running on your computer. For details, see Accessing the IB-2x Home Page. |
![]()