Windows 95/98 Printing: TCP/IP
This section explains how to install the IB-2x for the
Windows 95/98 environment. It covers the following topics:
Windows encompasses a wide range of client
versions;
from Windows 3.1 to Windows 2000, and thus a wide range of printing
capabilities. The various versions of Windows in combination with the IB-2x offer the network printing capabilities described below.
| LPR (Line Printer Remote) |
Printing to a Windows LPR
spooler over TCP/IP connection. |
| IPP (Internet Printing
Protocol) |
Printing over the Internet or
intranet using the Internet Printing Protocol. |
| Novell NetWare |
Printing to a NetWare print
queue when a NetWare server is present. For details on NetWare printing,
see NetWare Printing. |
| NetBEUI |
Peer to peer printing using the
NetBEUI protocol. Printers are available in Windows Network Neighborhood.
NetBEUI printing is fully detailed in Windows
95/98 Printing: NetBEUI. |
| Windows Printer Sharing |
Printing to a shared network
printer which is configured on another Windows PC. |
The
IB-2x CD-ROM includes the AdminManager
utility which may be used to configure the printing environment for any of the
above methods. To install AdminManager, refer to Installing the
IB-2x Utilities.
Alternatively, the Quick
Setup Wizard included in the IB-2x CD-ROM may be used for configuration of
the most common items. Refer to IB-2x Quick Configuration Guide supplied on
the CD-ROM and in hard copy format.
Which Print Method to Use?
The optimum Windows printing configuration for
you depends upon your particular environment including user and administrator
experience and preferences. Generally, NetWare print services will be utilized
when a NetWare server is present. In the absence of a NetWare server, LPR
printing in combination with printer sharing is often utilized when TCP/IP is
already in use. NetBEUI peer-to-peer printing is most often utilized when a
centralized NetWare or Windows print server is not used. IPP is utilized when
printing across the Internet or intranet is required.
Configuring
the PC for TCP/IP
To see if your Windows 95/98 PC has the TCP/IP protocol already
installed,
proceed as follows:
- Select Windows Start>Settings>Control
Panel.
- Double click Network.
- Click the Configuration tab and locate TCP/IP
-> .....
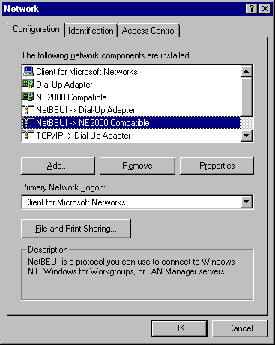
Figure 1. TCP/IP Protocols in Network Protocols
If TCP/IP -> (Network adapter name) is not in the list,
click on Add to install it. For details on installing network services
and protocols in Windows, refer to the Windows documentation or Help.
You can verify the current IP address, subnet
mask, and gateway of your PC by selecting TCP/IP -> (Network adapter name)
and clicking Properties.
Configuring the IP Address Using AdminManager
To
configure the IP address for the IB-2x, you can choose from several methods,
including using the IB-2x AdminManager. All methods are described in IP Address
Configuration. In this section, we use
AdminManager to explain IP address configuration.
If you have not already installed AdminManager from the
IB-2x CD-ROM, refer to Installing the IB-2x Utilities.
Before proceeding, make sure that the IB-2x interface card
is properly installed in the printer. If you have not already done so, refer to Installing the
IB-2x Interface Card in the Printer.
In the following, it is assumed that TCP/IP is active in the
network.
- Select Windows Start>Programs>IB-2x
Tools and run AdminManager.
- On the list displayed, highlight (click) the interface card you want to
configure.
If you do not see the interface card on the list, click  or select Search from the File menu.
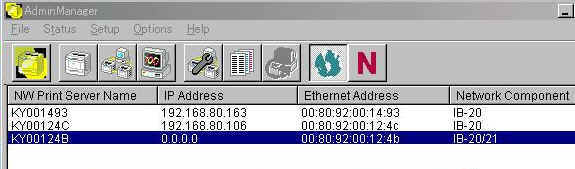
Figure 2. Selecting the Target IB-2x
- The IB-2x interface cards have been factory-allocated with a
temporary IP address of '0.0.0.0.' If a DHCP server is active in your
network, however, it will automatically be assigned a new IP address as soon
as the interface card is found on the network. If you do not intend that
the printer receives its IP address from the DHCP server, you must later
deactivate the DHCP for the interface card by clearing the checkbox for
Use DHCP/BOOTP in Figure 4. below.
For details on DHCP, see IP Address
Configuration.
- From Setup, select Enter Initial IP Address. The IP
Address Setup window will open.
- You can shortcut to this window by double-clicking the interface card.
In this case, you are prompted to confirm that you want to set the IP
address.
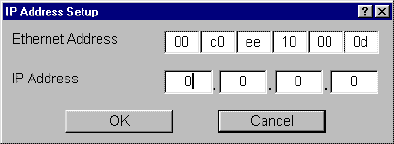
Figure 3. IP Address Setup Window
- In Ethernet Address, enter the Ethernet address of the interface
card, e.g. '00:c0:ee:10:00:0d.' This information is labeled on the back of
the interface card. It
is also displayed on the Network Status Page.
- In IP Address, enter the IP address to allocate for the interface
card, e.g. '192.168.110.171.'
- Click OK.
Subnet Mask Address and Gateway Address
Once the initial IP address has been set, you can enter the subnet mask
address and default gateway address. Proceed as follows:
- From the Setup menu, select Protocols. The Protocol Setup
window will open. Click the TCP/IP tab.
- You can shortcut to the Protocol Setup window by double-clicking
on the interface card.
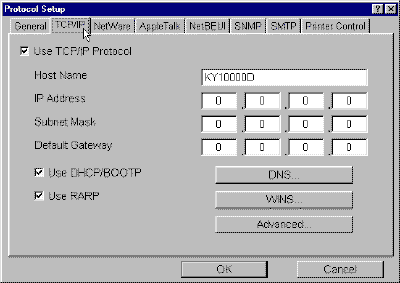
Figure 4. TCP/IP Tab
- In
Figure 4. above, enter the Subnet Mask and Default Gateway
addresses. If you are unsure of the correct subnet mask and the first number
in the IP address is from 192 to 254, then use 255.255.255.0 as the subnet
mask. For the default gateway address use the IP address of the router for
that network segment. If it is not a routed network, the default gateway
address may be left blank.
- Check Use TCP/IP Protocol.
- Uncheck
Use DHCP/BOOTP and Use RARP unless you intend to use DHCP,
BOOTP or RARP to assign the IP
address.
- Click OK. A Summary of configuration changes is
displayed.
- Click OK. A confirmation for resetting the interface card is
displayed.
- Click Yes to finalize the procedure.
To
setup TCP/IP printing, you must create a printer port. See Creating
a KPrint
Port for TCP/IP Printing below.
Changing the IP Address
To change the IP address of the interface card after the
initial installation, perform the same procedure as Configuring
the IP Address Using AdminManager above except enter the new IP address in
addition to the subnet mask and default gateway in step 2.
Creating
a KPrint Port for TCP/IP Printing
KPrint is a utility that creates a Windows 95/98
TCP/IP port based on the IP address given to the IB-2x interface card. The IB-2x
supports two methods of TCP/IP printing; Windows LPR (Line Printer
Remote) spooler and IPP (Internet Printing Protocol).
Once
installed, you can use this utility to create ports for any IB-2x connected
printers on the network. If you have not already done so, install the KPrint
utility following the procedure in Installing the
IB-2x Utilities.
Using LPR:
- Run the KPrint Add Port wizard by selecting Windows Start>Programs>KPrint
and clicking Add KPrint Port.
- In the KPrint Add Port Wizard, select Print by LPR. This
creates a port which will appear under Windows' 'Add Printer' wizard. See Figure
10.
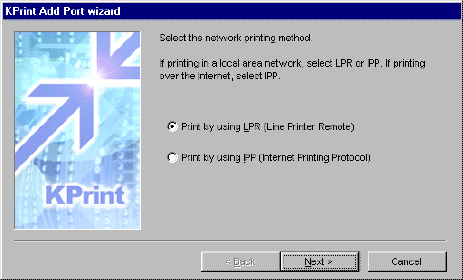
Figure 5. Selecting LPR or IPP for TCP/IP Printing
- LPR prints to a Windows LPR spooler over TCP/IP.
- IPP prints over the Internet or intranet using the
Internet Printing Protocol. To print via IPP, see Using
the Internet Printing Protocol below.
- Click Next.
- In IP address or host name below, you can directly
type in the IP address of the IB-2x. Or, if you click Search, the IB-2x
Search window opens which lists all available IB-2x printers on the network. Select the
IB-2x printer from the list.
- If
you click Configure, you can modify the scope of the search by
specifying one or more specific network segment addresses. In the Search
Configuration window, enter the network segment followed by '255,' e.g.
'221.62.168.255.' This causes the search to be conducted only in the
'221.62.168.0' segment.
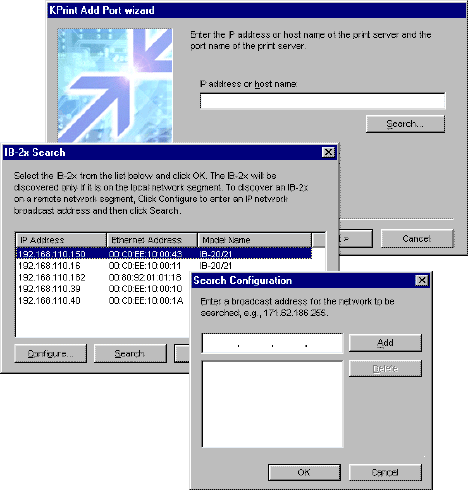
Figure 6. Specifying IP Address for the Port
- Click OK. Destination printer port name is
displayed.
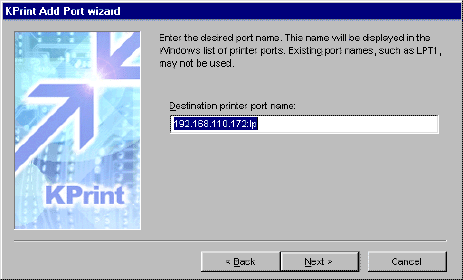
Figure 7. Destination Printer Port Name
- Change the port name as desired. The default name is 'IP
address:lp.'
- Click Next. Confirm the configuration.
- Click Finish. The port has been created and KPrint
quits automatically.
- Proceed to Installing
the Printer under Windows 95/98.
Using
IPP (Internet Printing Protocol):
- Follow steps as 1 through 4 of Using LPR:
above.
- In the KPrint Add Port wizard, select IPP. This
creates a port which will appear under Windows' Add Printer Wizard.
See Figure 10.
- Click Next. If you are using a proxy server for
Internet access, check Yes, ...; if not, check No, .... If Yes,
enter the proxy server address in Address and its port number in Port
number.
- KPrint automatically detects
an available proxy server address and port
number.
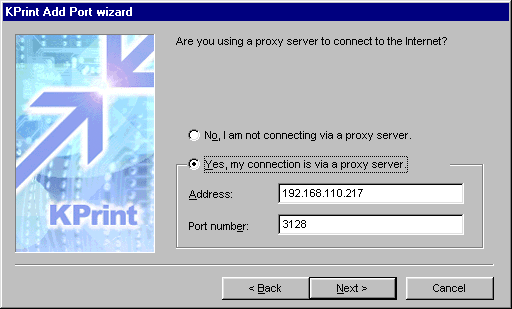
Figure 8. Proxy Information
- Click Next. In Printer URL, specify the URL of the printer.
This is represented by its IP address, followed by '/ipp.'

Figure 9. Specifying the Printer URL
- Click Next. Confirm the configuration.
- Click Finish. The port has been created and KPrint quits
automatically.
- Proceed to Installing the Printer under
Windows 95/98 below.
Installing the Printer under Windows 95/98
After
you have successfully created a KPrint port, you are ready to configure the
printer to print to the new port. This procedure follows the standard Windows' Add
Printer Wizard.
Before proceeding, make sure that:
- If you have not already done so, install the printer driver
for the printer. For details, see Installing the Printer
Drivers.
- Select Windows Start>Settings>Printers.
- In
the Printers folder, right click the printer driver that will be used
to print to the LPR or IPP port and select Properties.
- Click the Details tab. Click the pull-down menu for Print
to the following port and select the LPR or IPP port you created.
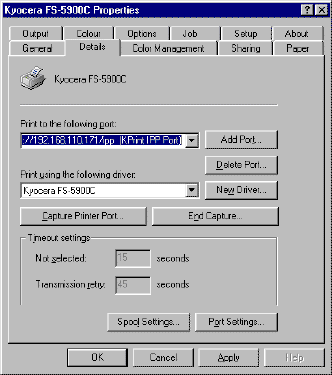
Figure
10. Specifying the IPP Port
- The
LPR or IPP port name is followed by (KPrint LPR Port) or (KPrint
IPP Port)
- Click OK.
To print from an application, select the IB-2x printer in the application's Print menu. The printer driver
allows you to fully utilize the software and hardware features of the printer.
Sharing the
Printer under Windows
Windows printer sharing involves a Windows machine functioning
as a host. This host acts as a print server; spooling jobs sent from
Windows clients to the shared printer and forwarding them to the physical
printer. Any Windows machine (after Windows 3.1) may function as either a client
or a host or both.
The protocols used from client to host and from host to
printer do not need to be the same. For example, if a Windows NT machine is
configured to share an LPR printer, clients running only IPX or NetBEUI can
still send jobs to that printer share. The Windows NT host will accept the jobs
over IPX or NetBEUI and send them to the printer over TCP/IP. This capability
provides tremendous flexibility in Windows network printing architecture.
To share the IB-2x printer with other Windows computers, use the following procedure:
- Select Windows Start>Settings>Control Panel
and double click Network.
- Verify that File and printer sharing for Microsoft
Networks is installed.
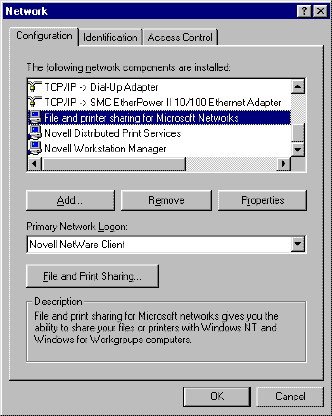
Figure 11. Network Properties
-
On the same screen, click the File and
Print Sharing button and click the appropriate checkbox to allow printer
sharing.
-
Select Windows Start>Settings>Printers, right click on the printer, and select Sharing.
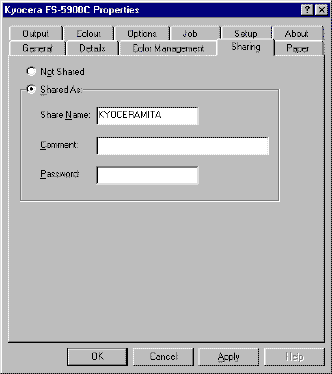
Figure 12. Sharing the Printer
-
Click on Shared As and enter the
desired shared name, e.g. 'KYOCERAMITA' above.
-
Click OK.
